Active Gain Control (AGC) is a technology used in communication systems, including WiFi networks, to automatically adjust the amplification of a signal to maintain optimal performance. This is crucial for ensuring consistent signal quality and reliability. Here’s how it works and its importance in the context of WiFi, especially in environments like RV parks:
How Active Gain Control Works
Signal Detection: AGC continuously monitors the incoming signal strength.
Dynamic Adjustment: Based on the signal’s strength, AGC automatically adjusts the gain (amplification level) of the receiver or transmitter. This helps maintain a consistent signal level despite variations in the input signal.
Feedback Loop: The system uses a feedback loop where it assesses the output and makes real-time adjustments to the gain.
Noise Reduction: By optimizing the signal level, AGC minimizes the impact of noise and interference, improving overall signal quality.
Key Components of AGC
Gain Amplifier: Varies the amplification based on control signals.
Detector: Measures the signal strength.
Control Circuit: Calculates the required gain adjustment and sends signals to the amplifier.
Feedback Mechanism: Ensures the adjustments are continuously fine-tuned.
Importance of AGC in WiFi Systems
Consistent Signal Quality: AGC helps maintain a stable and clear signal by compensating for fluctuations in signal strength due to distance, obstacles, or interference. This is particularly beneficial in RV parks, where signal conditions can vary widely.
Improved Connectivity: By dynamically adjusting the gain, AGC helps maintain reliable connections even as devices move or environmental conditions change, reducing the likelihood of dropped connections or poor performance.
Better Coverage: In environments with varied distances from the access point (like large RV parks), AGC helps ensure that users at different distances receive adequate signal strength.
Enhanced User Experience: AGC contributes to a seamless WiFi experience by reducing latency, improving data throughput, and providing more consistent coverage, which is essential for applications like streaming, video conferencing, and online gaming.
Efficient Power Use: By adjusting the gain automatically, AGC helps avoid over-amplification, which can save power and reduce unnecessary signal emissions, contributing to a more energy-efficient network.
Application in RV Parks
In RV parks, AGC is particularly useful because:
Varied Terrain and Obstructions: Trees, buildings, and RVs themselves can create signal obstructions and cause variability in signal strength.
Mobility of Users: As users move around the park, their distance from WiFi access points changes, making dynamic signal adjustment critical for maintaining a consistent connection.
Network Load: AGC can help manage the load by adjusting to varying signal strengths caused by differing levels of network traffic.
Summary
Active Gain Control is essential for enhancing the performance and reliability of WiFi systems in dynamic and variable environments like RV parks. By automatically adjusting the signal amplification, AGC ensures consistent signal quality, improves connectivity, and enhances the overall user experience.
View some of our most popular inline amplifiers here.
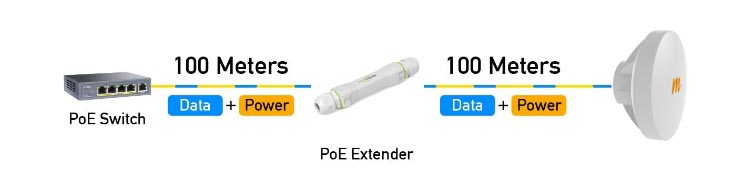
Cat5 cables, although widely used and reliable, have a practical 100 meter limit on the distance they can transmit data effectively.
This limitation can pose challenges in scenarios where devices need to be connected over extended distances, such as security camera installations, outdoor Wi-Fi setups, or industrial applications.
GNS Wireless is now stocking outdoor POE Extenders for both 10/100 and Gigabit applications, addressing the constraints of Cat5 cables with its innovative PoE extenders. Let’s explore how these devices empower users to extend the range of PoE-capable devices effortlessly:
Increased Distance Capability: GNS Wireless PoE extenders break through the traditional distance limitations of Cat5 cables. By seamlessly extending the reach of your network, these devices ensure that PoE-capable devices can be deployed in areas that were previously unreachable, providing flexibility in network design.
PoE Power and Data Transmission: The PoE technology integrated into GNS Wireless extenders enables both data and electrical power to be transmitted over a single Cat5 cable. This eliminates the need for additional power sources at the device location, simplifying installations and reducing costs.
Plug-and-Play Simplicity: GNS Wireless PoE extenders are designed with user-friendly installation in mind. The plug-and-play functionality ensures that extending the range of PoE devices is a straightforward process, making it accessible to users with varying technical expertise.
Compatibility Across Devices: Whether you are extending the range for security cameras, access points, or other PoE-powered devices, GNS Wireless PoE extenders offer versatile solutions that cater to a wide range of applications.
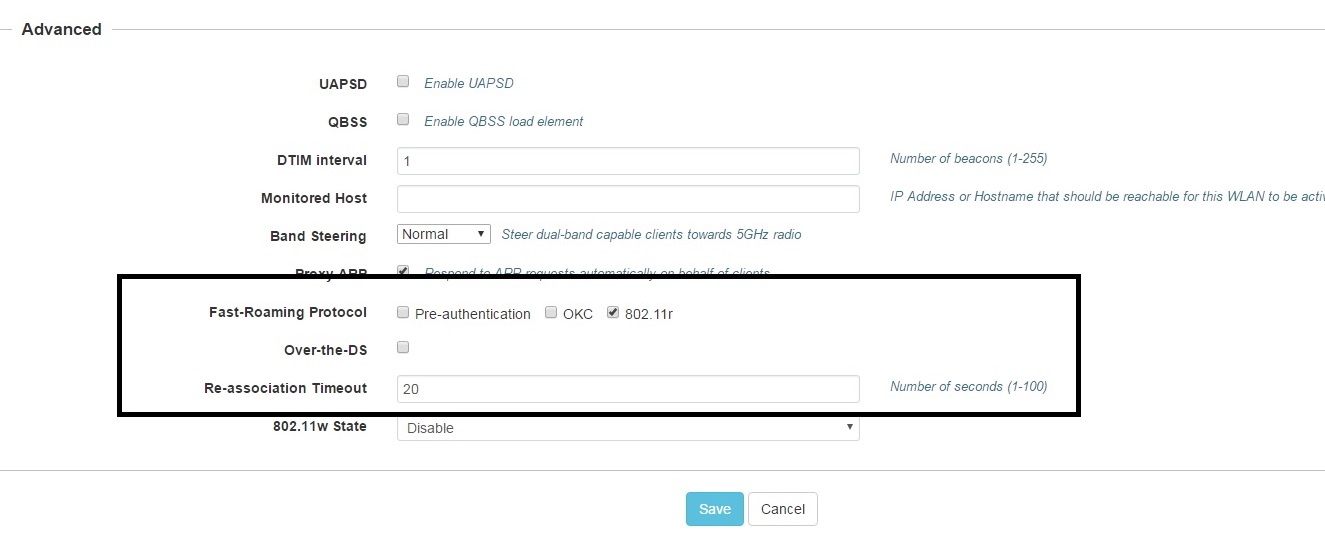
802.11r is a roaming protocol standard to complete fast transitions when clients are moving between different APs.
Enhanced roaming feature is to make sure no clients are sticky and remain connected to one AP even though they have weak RSSI values or SNR threshold.
If you have both enabled, then the enhanced roaming feature will make sure clients are not sticky, and 802.11r will make sure that 802.11r supported clients will roam seamlessly to other nearby Cambium APs.
The 2 are totally independent because if the clients are at a state where it refuses to roam to another AP, then enhanced roaming will disconnect the client so that it can look to move to another AP with stronger signal strength. So in this case once a client is disconnected, roaming does not come in to the picture, since it will be a new association to another AP. And for those 802.11r supported clients that are not sticky and follow the right standards of triggering their own roaming thresholds and try to roam to another AP well within the SNR threshold set for enhanced roaming, then they will follow the 802.11r Fast-Transition protocols to roam to another AP.
Keep in Mind, Not all client devices support all of the protocols designed for seamless roaming. 802.11/k, 802.11v, and 802.11r
802.11r is a standard within the IEEE 802.11 family of standards that specifically addresses fast roaming in Wi-Fi networks.
The full name of the standard is “IEEE 802.11r” and it is also known as Fast Basic Service Set (BSS) Transition.
When you roam from one cell to the other, the device wastes time. This is because the device stays associated to the current cell until the signal becomes too poor to be usable and then (only then):
Leaves the channel to scan and discover other channels where the SSID is available (this scanning process wastes times, in a configuration where your communication is already bad)
Once a new AP is chosen, the device needs to authenticate to that new AP, the disassociate from the old AP, then associate to the new AP.
This is particularly important in a voice call, where every millisecond counts. If the connection takes too long (you need to re-enter a 4 way WPA2 handshake) before have a key that you can use. This process can be disruptive. The other bad news is that you have no idea on whether the new AP can continue your call or not (it may be completely overloaded already).
So 802.11r was designed to allow your device to run the next AP discovery process before leaving the previous cell, including negotiating the key with the new AP, and checking that the new AP can provide the same QoS services as the older one… and only then, once everything is ready, the device would make the short jump to the next AP. 802.11r can save a lot of time. In the illustration below, I roamed back and forth between two APs (WPA2/PSK). In the first case, 802.11r is not enabled.
The best APs to use for roaming are the latest XV2s from Cambium such as the GNS-XV2, or smaller GNS-XV2-23T.
The 802.11r is a roaming protocol standard to complete fast transitions when clients are moving between different APs.
*Enhanced roaming feature is to make sure no clients are sticky and remain connected to one AP even though they have weak RSSI values or SNR threshold.*
If you have both enabled, then the enhanced roaming feature will make sure clients are not sticky, and 802.11r will make sure that 802.11r supported clients will roam seamlessly to other nearby Cambium APs.
The 2 features are totally independent because if the clients are at a state where it refuses to roam to another AP, then enhanced roaming will disconnect the client so that it can look to move to another AP with stronger signal strength.
So once a client is disconnected, roaming does not come in to the picture, since it will be a new association to another AP. And for those 802.11r supported clients that are not sticky and follow the right standards of triggering their own roaming thresholds and try to roam to another AP well within the SNR threshold set for enhanced roaming, then they will follow the 802.11r Fast-Transition protocols to roam to another AP.
Fast roaming (802.11r) refers to the ability of a Wi-Fi-enabled device to quickly and seamlessly transition between different access points (APs) within a wireless network without experiencing significant disruptions in connectivity.
An example of where to enable the fast roaming protocol, 802.11r is illustrated above on the GNS-XV2-23T.
The traditional Wi-Fi roaming process involves a temporary disconnection from one access point and a subsequent reconnection to another, which can result in a brief interruption in service. Fast roaming aims to minimize this interruption, making the transition smoother and faster.
The need for fast roaming is particularly crucial in scenarios where continuous and uninterrupted connectivity is essential. Examples include applications like voice over IP (VoIP), video streaming, online gaming, and real-time data transmission. Fast roaming ensures that users can move freely within a Wi-Fi network without experiencing noticeable delays or drops in their network connection.
Several protocols and standards contribute to achieving fast roaming in Wi-Fi networks. One such standard is IEEE 802.11r, also known as Fast Basic Service Set (BSS) Transition. This standard introduces mechanisms to streamline the authentication and key negotiation processes during handovers between access points, reducing the time it takes for a device to switch from one AP to another.
Key techniques involved in fast roaming include:
Pre-authentication: Devices authenticate with a new access point before the actual handover, reducing the time needed to establish a connection when moving to a new coverage area.
Pairwise Master Key (PMK) Caching: Storing and reusing cryptographic keys associated with a user’s connection, allowing for faster reauthentication when switching between access points.
Fast Transition (FT): The FT protocol, defined in the IEEE 802.11r standard, facilitates fast roaming by enabling the secure and efficient transfer of authentication information during handovers.
Opportunistic Key Caching: This technique involves caching keys for potential future use, anticipating handovers and further reducing the authentication time.
Fast roaming enhances the user experience by minimizing disruptions during device mobility within a Wi-Fi network. It is especially beneficial in environments with high mobility, such as airports, train stations, retail spaces, and outdoor areas, as well as in applications involving devices like smartphones, tablets, laptops, and other wireless-enabled devices.
What phones support 802.11 r?
All Samsung Android devices from Android P and onwards support 802.11r.
To discuss further your Wi-Fi application, and for help in determining when and how to use 802.11r, contact GNS Wireless today. We are here to help! (877) 209-5152
In the ever-evolving landscape of digital connectivity, the demand for high-speed internet has become non-negotiable.
Whether you’re a business owner looking to streamline operations or a homeowner seeking seamless entertainment, the answer lies in the cutting-edge solution of Wireless Broadband. GNS Wireless, a pioneer in wireless communication, stands out as the go-to provider for unleashing the true potential of your online experience.
The Need for Speed: Why Fast Fiber Wireless Broadband?
1. Lightning-Fast Speeds:
Fast Fiber Wireless Broadband, as offered by GNS Wireless, is synonymous with speed. Say goodbye to buffering and lagging, and welcome uninterrupted streaming, gaming, and file downloads. With speeds that can rival traditional wired connections, you’ll experience a new era of online efficiency.
2. Future-Proof Connectivity:
As technology advances, so does our dependence on high-speed internet. Fast Fiber Wireless Broadband ensures that you stay ahead of the curve, providing a future-proof solution that adapts to the ever-increasing demands of modern digital life.
3. Seamless Connectivity:
No more grappling with tangled wires or limited mobility. GNS Wireless’s Fast Fiber solution liberates you from the constraints of traditional broadband, offering seamless connectivity that extends to every corner of your home or office. Enjoy the freedom to work, play, and connect without limitations.
The GNS Wireless Advantage: How They Deliver Unmatched Connectivity
1. Cutting-Edge Technology:
GNS Wireless is at the forefront of wireless communication technology. Their Fast Fiber Wireless Broadband solution leverages the latest advancements to deliver unparalleled speed and reliability. Trust in a provider that is committed to staying ahead in the rapidly evolving world of connectivity.
2. Customized Solutions:
Recognizing that different users have different needs, GNS Wireless offers customized solutions tailored to your specific requirements. Whether you’re a small business looking for scalable connectivity or a household seeking a reliable internet connection, GNS Wireless has the perfect solution for you.
3. Reliable Support:
Fast Fiber Wireless Broadband is not just about speed; it’s also about reliability. GNS Wireless provides round-the-clock customer support, ensuring that any issues are addressed promptly. Experience peace of mind knowing that your connectivity needs are in capable hands.
How to Get Started: Visit GNS Wireless Today!
Ready to embrace the future of connectivity? Visit GNS Wireless today and explore the full range of Fast Fiber Wireless Broadband solutions. Elevate your online experience, whether for business or pleasure, with a provider that prioritizes speed, reliability, and customer satisfaction.
In conclusion, Fast Fiber Wireless Broadband by GNS Wireless isn’t just a solution; it’s a gateway to a new era of connectivity. Say goodbye to slow connections and hello to a world where speed meets reliability. Make the smart choice – choose GNS Wireless for a seamless online experience like never before!
Setting up WiFi in a boat storage yard involves several considerations, including the purpose, users, equipment, and the physical layout of the area.
Here’s a comprehensive guide on how, why, who, and where regarding “Boat Storage Yard WiFi.”
Why:
Customer Convenience: Providing WiFi in a boat storage yard enhances customer experience, allowing boat owners to access the internet while waiting or performing maintenance on their boats.
Security: WiFi can be used for surveillance cameras and security systems, improving overall safety within the storage facility.
Operational Efficiency: WiFi enables staff to use mobile devices for inventory management, communication, and other operational tasks, streamlining processes.
How:
Planning:
Site Survey:
Assess the size and layout of the boat storage yard to determine the number and placement of WiFi access points.
Identify potential obstacles, interference sources, and dead zones.
Bandwidth Requirements:
Estimate the number of users and their expected activities (e.g., basic browsing, streaming, security systems) to determine bandwidth needs.
Consider APs with beamforming technology for better coverage.
Network Infrastructure:
Install high-quality routers, switches, and cabling to ensure a stable network.
Security Measures:
Implement WPA3 encryption and strong passwords to secure the network.
Use firewalls and regularly update firmware to protect against vulnerabilities.
Implementation:
Placement of Access Points:
Install APs strategically to cover the entire storage yard evenly.
Avoid placing APs too close to each other to prevent interference.
Network Configuration:
Configure the network with a separate guest network for visitors to ensure the security of the internal operations.
Monitoring and Maintenance:
Implement network monitoring tools to identify and address issues promptly.
Regularly update firmware and security protocols.
Who:
IT Professionals:
Consult with GNS Wireless, whom are IT professionals experienced in designing and implementing outdoor WiFi networks.
Security Experts:
Involve security experts to ensure the network is secure from potential cyber threats.
Facility Managers:
Collaborate with facility managers to understand specific needs and constraints of the boat storage yard. Typically when we ship outdoor WiFi equipment, it is ready to install.
Where:
Strategic Locations:
Install access points at strategic locations, considering factors like line of sight, potential interference, and coverage area.
Equipment Housing:
Protect networking equipment in weatherproof enclosures or cabinets to shield them from environmental elements.
Customer Areas:
Ensure WiFi coverage in areas where customers are likely to spend time, such as waiting areas or service centers.
Security Zones:
Implement WiFi coverage in areas critical for security, such as entrance gates, surveillance camera locations, and restricted access points.
Additional Tips:
Regulatory Compliance:
Ensure compliance with local regulations and obtain any necessary permits for installing outdoor WiFi equipment.
User Guidelines:
Communicate guidelines to users regarding acceptable use and security practices.
Scalability:
Design the network with scalability in mind to accommodate future growth in users and devices.
By carefully planning, implementing, and maintaining a WiFi network in a boat storage yard, you can enhance customer experience, improve security, and optimize operational efficiency.
GNS Wireless offers products and services that could be beneficial for setting up WiFi in a boat storage yard. Here’s a general guide on how a wireless networking company might assist:
Outdoor Wireless Access Points:
GNS Wireless offers outdoor-rated and weatherproof wireless access points suitable for the challenging conditions of a boat storage yard.
Point-to-Point Wireless Bridges:
In cases where there are long distances between buildings or areas within the storage yard, wireless bridges could be essential. These bridges create a dedicated connection, enhancing network performance.
Wireless Networking Consultation:
GNS Wireless provides consultation services to help plan and design the wireless network infrastructure, ensuring optimal coverage and performance.
Security Solutions:
Companies specializing in wireless solutions often provide security features such as encryption protocols and secure authentication to protect the network from unauthorized access.
Network Expansion and Scalability:
GNS Wireless offers solutions that allow for easy network expansion and scalability, accommodating future growth and increasing demands for bandwidth.
Are you tired of dropped calls and slow data speeds on your cell phone? Poor cell phone reception can be frustrating, but the solution is within reach!
In this blog post, we’ll explore how the WeBoost 100 package can significantly boost your cell phone reception, keeping you connected when it matters the most.
Understanding the WeBoost 100 Package: The WeBoost 100 is a powerful signal booster designed to enhance cell phone reception in both residential and small office environments. This package includes all the essentials to amplify your cellular signal and improve call quality, data speeds, and overall connectivity.
How Does it Work? The WeBoost 100 works by capturing the existing outside cell signal, amplifying it, and then redistributing the boosted signal within your home or office. This process helps overcome obstacles like building materials or distance from cell towers that may weaken your signal.
Easy Installation Process: One of the key advantages of the WeBoost 100 package is its user-friendly installation process. The kit comes with a step-by-step guide, making it easy for anyone to set up without professional help. Simply follow the instructions, and you’ll be enjoying a stronger cell signal in no time.
Components of the WeBoost 100 Package:
WeBoost Amplifier: This powerful device is the heart of the system. It takes in the existing cell signal and amplifies it to provide a stronger, more reliable connection.
Outdoor Antenna: The outdoor antenna captures the existing cell signal from outside your building and sends it to the amplifier.
Indoor Antenna: Once the signal is amplified, the indoor antenna redistributes it throughout your home or office, ensuring consistent coverage.
Coaxial Cables: High-quality coaxial cables connect the different components of the system, facilitating the seamless flow of the boosted signal.
Power Supply: The package includes a power supply to ensure the continuous operation of the WeBoost amplifier.
Benefits of the WeBoost 100 Package:
Improved Call Quality: Say goodbye to dropped calls and fuzzy conversations.
Faster Data Speeds: Enjoy faster download and upload speeds for a smoother online experience.
Wider Coverage: The WeBoost 100 provides extended coverage, ensuring that every corner of your space has a reliable cell signal.
Where to Get the WeBoost 100 Package: Ready to boost your cell phone reception? You can find the WeBoost 100 package here. Order now and experience the difference in your cell phone connectivity.
Conclusion: Don’t let poor cell phone reception hinder your communication and productivity. Invest in the WeBoost 100 package and enjoy a stronger, more reliable cell signal. Stay connected effortlessly and experience the benefits of enhanced cell phone reception today.
Band steering is a technique used in wireless networking, particularly in the context of Wi-Fi. It optimizes the distribution of devices between different frequency bands, typically between the 2.4 GHz and 5 GHz bands.
In a Wi-Fi 6 (802.11ax) wireless network, band steering becomes particularly important due to the increased data rates and capacity that Wi-Fi 6 offers.
Here’s why band steering is crucial when implementing a new Wi-Fi 6 wireless network at an RV park:
Optimizing Network Capacity:
Wi-Fi 6 introduces technologies like Orthogonal Frequency Division Multiple Access (OFDMA) and Basic Service Set (BSS) Coloring, which enhance the capacity of the wireless network. Band steering helps distribute devices across different bands, reducing congestion and maximizing the available capacity.
Leveraging the 5 GHz Band:
Wi-Fi 6 operates in both the 2.4 GHz and 5 GHz bands. The 5 GHz band generally provides faster data rates and is less congested than the 2.4 GHz band. Band steering encourages capable devices to connect to the 5 GHz band, optimizing performance and freeing up capacity on the 2.4 GHz band for devices that may not support 5 GHz.
Improving Device Performance:
Wi-Fi 6 supports more simultaneous connections and offers improved performance compared to previous Wi-Fi standards. Band steering ensures that devices capable of utilizing the features of Wi-Fi 6, such as increased throughput and better efficiency, are directed to the appropriate band for an optimal experience.
Enhancing Roaming Efficiency:
RV parks often have large areas, and visitors’ devices may move around. Band steering helps in seamless roaming by steering devices to the appropriate band as they move within the park. This ensures a consistent and reliable connection without interruptions.
Addressing Interference Issues:
The 2.4 GHz band is more susceptible to interference from various devices, including household appliances and other Wi-Fi networks. Band steering helps mitigate interference issues by encouraging devices to connect to the less congested and interference-prone 5 GHz band.
Implementing band steering in a Wi-Fi 6 network at an RV park is vital for optimizing capacity, improving device performance, enhancing roaming capabilities, and addressing potential interference issues. It ensures that the network operates efficiently, providing a reliable and high-performance wireless experience for all users in the RV park.
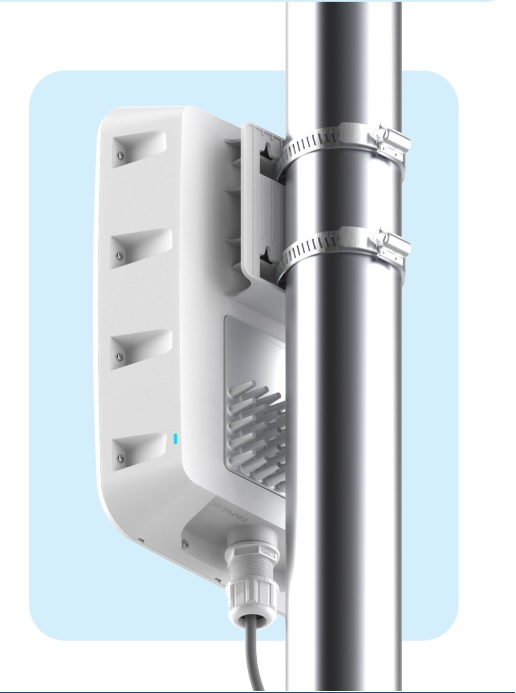
Large RV parks can benefit significantly from advanced outdoor access points like the GNS Wireless XV2-23T, especially with features like band steering. Here’s why such a device is essential for large RV parks:
High Capacity and Throughput:
Large RV parks often attract a substantial number of visitors, each with multiple wireless devices. The XV2-23T, equipped with Wi-Fi 6 technology and band steering, helps distribute devices efficiently across different frequency bands, optimizing capacity and maximizing throughput. This ensures that all users experience fast and reliable connections.
Mitigating Interference:
RV parks can be challenging environments with potential interference from nearby networks, electronic devices, and other wireless signals. Band steering in the XV2-23T helps direct devices to less congested and interference-free frequency bands
Seamless Roaming:
RV park visitors are likely to move around the premises, and seamless roaming is crucial for maintaining a stable connection. Band steering assists in directing devices to the most suitable band as users roam, ensuring a smooth transition without disruptions.
Enhanced Device Compatibility:
With the growing number of Wi-Fi-enabled devices, compatibility becomes a key consideration. The XV2-23T, with band steering, ensures that devices capable of utilizing the advanced features of Wi-Fi 6 are directed to the appropriate band, optimizing their performance and enhancing the overall network efficiency.
Improved User Experience:
Band steering contributes to a better user experience by intelligently managing device connections. Users benefit from faster speeds, reduced latency, and a more stable connection, especially in scenarios where numerous devices are connected simultaneously.
Optimal Coverage and Range:
Large RV parks require access points with robust coverage and extended range. The XV2-23T, designed for outdoor use, provides reliable coverage over a wide area, ensuring that all areas of the RV park have access to high-quality Wi-Fi.
Future-Proofing the Network:
Wi-Fi 6 is the latest wireless standard, offering advanced features and improved performance. Implementing devices like the XV2-23T ensures that the RV park’s network is future-proofed, ready to accommodate the increasing number of devices and evolving technology standards.
In summary, the GNS Wireless XV2-23T outdoor access point, with band steering functions, is well-suited for large RV parks. It addresses the specific challenges of high user density, interference, roaming, and device diversity, providing a robust and reliable wireless infrastructure for both park management and visitors.
Is your current wireless setup struggling to keep up with the demands of voice calls and occasional file transfers?
It might be time for a more powerful solution.
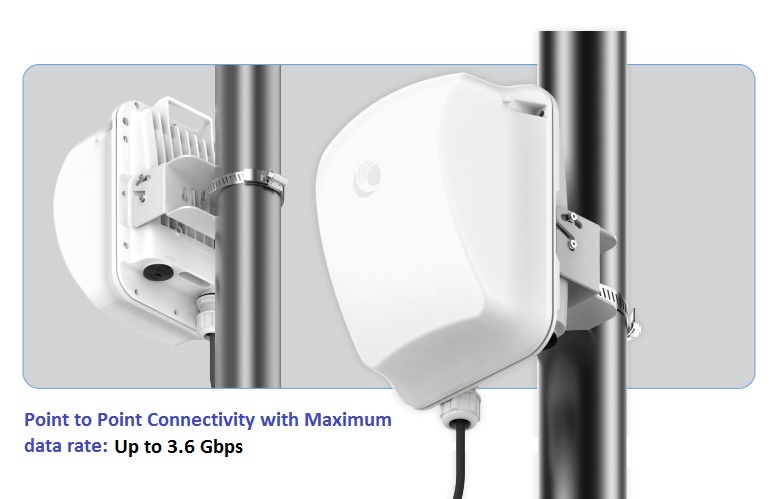
GNS Wireless offers a game-changing Gigabit Point-to-Point Wireless Bridge, for short to medium range, that is not only cost effective, but designed to enhance your connectivity for dependable voice traffic and seamless file transfers. Let’s explore how you can easily make the upgrade.
Why Upgrade to GNS Wireless Gigabit Point-to-Point Bridge?
Unmatched Performance:
GNS Wireless provides a Gigabit Point-to-Point Bridge that outperforms traditional setups. With high data transfer rates, this solution ensures smooth voice calls and rapid file transfers, even over extended distances.
Interference-Free Operation:
Say goodbye to connectivity issues caused by interference. GNS Wireless operates at 60 GHz, offering an interference-free environment for reliable communication. This is crucial for maintaining clear voice quality and consistent file transfer speeds.
Easy Installation and Configuration:
Don’t let the idea of upgrading intimidate you. GNS Wireless bridges are designed for easy installation and configuration. Follow the provided guidelines and take advantage of their customer support for a hassle-free setup.
Reliable Connectivity for Voice Calls:
Dependable voice traffic requires a stable connection, and GNS Wireless delivers just that. Experience crystal-clear voice calls without the worry of dropouts or disruptions, ensuring a seamless communication experience.
Efficient File Transfers:
Whether you’re sending large files occasionally or regularly, GNS Wireless provides a solution that can handle the demand. Enjoy faster and more reliable file transfers with the Gigabit Point-to-Point Bridge.
How to Upgrade:
Visit GNS Wireless to explore the features and benefits of the Gigabit Point-to-Point Wireless Bridge. Order the product that suits your needs and follow the provided instructions for installation and configuration. If you encounter any challenges, GNS Wireless offers responsive customer support to guide you through the process.
Conclusion: Upgrade your wireless connectivity today with GNS Wireless’s Gigabit Point-to-Point Bridge for a more powerful, interference-free, and dependable experience. Enhance your voice calls and file transfers with confidence, knowing that you have a reliable and efficient solution at your fingertips.
If you’ve been relying on traditional checkbox wireless networks, it’s time to consider a significant upgrade for better performance and user-friendly features.
GNS Wireless offers a robust solution that not only enhances your network’s capabilities but also simplifies the user experience.
Why Upgrade?
Reliability:
Checkbox wireless networks can be prone to interference and signal loss. GNS Wireless utilizes advanced wifi 6 cloud technologies to ensure a reliable and stable Wi-Fi connection, reducing the risk of dropped signals and interruptions.
Extended Range:
Traditional networks may struggle with coverage in larger areas or multi-story buildings. GNS Wireless provides extended range solutions, ensuring your network reaches every corner without compromising on speed or reliability. For those large parks or extended docks, we use a wireless bridge to wirelessly connect remote access points.
Ease of Use:
GNS Wireless prioritizes user-friendly interfaces, making it easy for individuals, businesses, and organizations to set up and manage their wireless networks. Say goodbye to complex configurations and hello to hassle-free connectivity.
Customization Options:
Unlike checkbox solutions, GNS Wireless allows for tailored configurations to meet your specific needs. Whether you require high-speed internet for streaming or a secure network for business operations, GNS Wireless has you covered. Call now: (877) 209-5152
Security Features:
Protect your data with enhanced security features provided by GNS Wireless. From encryption options to advanced access controls, your network will be safeguarded against unauthorized access and potential cyber threats.
How to Make the Switch:
Assessment: Evaluate your current network’s performance and identify areas of improvement. Consider factors like speed, coverage, and reliability. Email us a satellite view of your park, or a park map, and we will work on a heat map to illustrate the coverage area.
Choose the Right GNS Wireless Solution: GNS Wireless offers a range of products catering to various needs. Whether it’s a point-to-point link, a long-range outdoor solution, or an indoor access point, a GNS Wireless associate will help assist in selecting the product that aligns with your requirements.
Installation Assistance: GNS Wireless provides resources and support to ensure a smooth transition. Installation guides and customer support are available to assist you at every step.
Configuration Made Simple: Enjoy the simplicity of GNS Wireless with easy-to-use configuration interfaces. No need to be a networking expert – GNS Wireless makes it accessible to everyone.
Conclusion: Upgrading your wireless network to GNS Wireless is a smart investment for improved performance, extended coverage, and a hassle-free experience. Say farewell to the limitations of checkbox networks and embrace the advanced features that GNS Wireless has to offer. Upgrade today and enjoy a faster, more reliable, and user-friendly wireless network.
Call now! (877) 209-5152
Hydrogen fuel cells and the need for Wi-Fi are generally unrelated technologies, as they serve different purposes and operate in different domains.
However, one potential indirect connection could be in the context of remote monitoring and control systems for hydrogen fuel cell applications.
In certain settings, such as the industrial or automotive sectors, hydrogen fuel cells may be employed to generate electricity. In these applications, there could be a need for advanced monitoring and control systems to optimize the performance of the fuel cells, ensure safety, and gather real-time data on their operation.
This is where Wi-Fi or other communication technologies might come into play. Establishing a wireless network, including WiFi, can enable seamless communication between various components of a hydrogen fuel cell system.
Remote monitoring and control through WiFi could allow operators to access data, perform diagnostics, and make adjustments without physically being at the site where the fuel cells are installed.
While hydrogen fuel cells themselves do not inherently require Wi-Fi, the broader infrastructure surrounding their deployment and monitoring might involve wireless communication technologies to enhance efficiency, safety, and control.
What about Carbon Capture?
Carbon capture and storage (CCS) is a technology designed to capture carbon dioxide (CO2) emissions produced from the use of fossil fuels in electricity generation and industrial processes, preventing the release of CO2 into the atmosphere.
Indirect Connections:
Monitoring and Control Systems: Similar to hydrogen fuel cells, carbon capture facilities may benefit from advanced monitoring and control systems. Wireless communication technologies, including WiFi, could be employed for remote monitoring, data collection, and control of carbon capture processes. This allows operators to assess system performance, troubleshoot issues, and optimize operations without being physically present.
Data Transfer and Analysis: In carbon capture applications, there is a significant amount of data generated from sensors and monitoring equipment. A reliable and high-speed communication network, such as WiFi, can facilitate the transfer of this data for analysis. This is essential for understanding the efficiency of carbon capture processes, identifying areas for improvement, and ensuring compliance with regulatory standards.
Integration with Smart Grids: Carbon capture facilities may be part of broader energy systems that include smart grids. These grids often rely on communication technologies, including WiFi, to manage the flow of energy, optimize grid performance, and integrate low-carbon energy sources.
While WiFi may not be a core requirement for carbon capture technology itself, its use can enhance the efficiency, safety, and control of the systems associated with monitoring the carbon capture processes. In the broader context of the energy sector, wireless communication plays a role in facilitating the transition to more sustainable practices.
Microgrids powered by fuel cells, such as those provided by FuelCell Energy, can indeed benefit from reliable Wi-Fi and other communication technologies. Here’s how they might be connected:
Remote Monitoring and Control: Microgrids are often deployed in locations where access might be challenging. Utilizing reliable WiFi connections allows for remote monitoring and control of the fuel cell systems within the microgrid. Operators can access real-time data, assess performance, and make adjustments without being physically present at the site.
Optimizing Energy Distribution: WiFi connectivity can play a crucial role in optimizing the energy distribution within a microgrid. Real-time data on energy production, consumption, and storage can be communicated wirelessly, enabling the microgrid to respond dynamically to changes in demand and supply. This helps in maintaining stability and efficiency within the microgrid.
Fault Detection and Maintenance:Reliable WiFi connectivity aids in the early detection of faults or issues within the fuel cell systems. This facilitates timely maintenance and reduces downtime. Automated alerts can be sent to operators, allowing them to address potential problems swiftly.
Integration with Smart Grids: Microgrids are often designed to operate as part of larger smart grid systems. WiFi connectivity enables seamless integration with smart grids, allowing for coordination with the broader energy infrastructure. This integration helps in balancing loads, managing renewable energy sources, and participating in demand response programs.
Data Analysis for Efficiency Improvement: The data collected from fuel cell systems in a microgrid can be analyzed to identify patterns and trends. Reliable WiFi connectivity ensures that this data can be efficiently transmitted for analysis. Insights gained from data analysis can be used to enhance the overall efficiency and performance of the microgrid.
In summary, reliable WiFi connectivity is an essential component for the effective operation of microgrids powered by fuel cells. It enables remote monitoring, facilitates real-time data transmission, and supports the integration of microgrids with broader energy systems.
This connectivity contributes to the reliability, efficiency, and sustainability of microgrid solutions.
For more information on your industrial Wi-Fi application, contact GNS WIRELESS today. (877) 209-5152
This website uses cookies so that we can provide you with the best user experience possible. Cookie information is stored in your browser and performs functions such as recognising you when you return to our website and helping our team to understand which sections of the website you find most interesting and useful.
Strictly Necessary Cookies
Strictly Necessary Cookie should be enabled at all times so that we can save your preferences for cookie settings.
If you disable this cookie, we will not be able to save your preferences. This means that every time you visit this website you will need to enable or disable cookies again.