
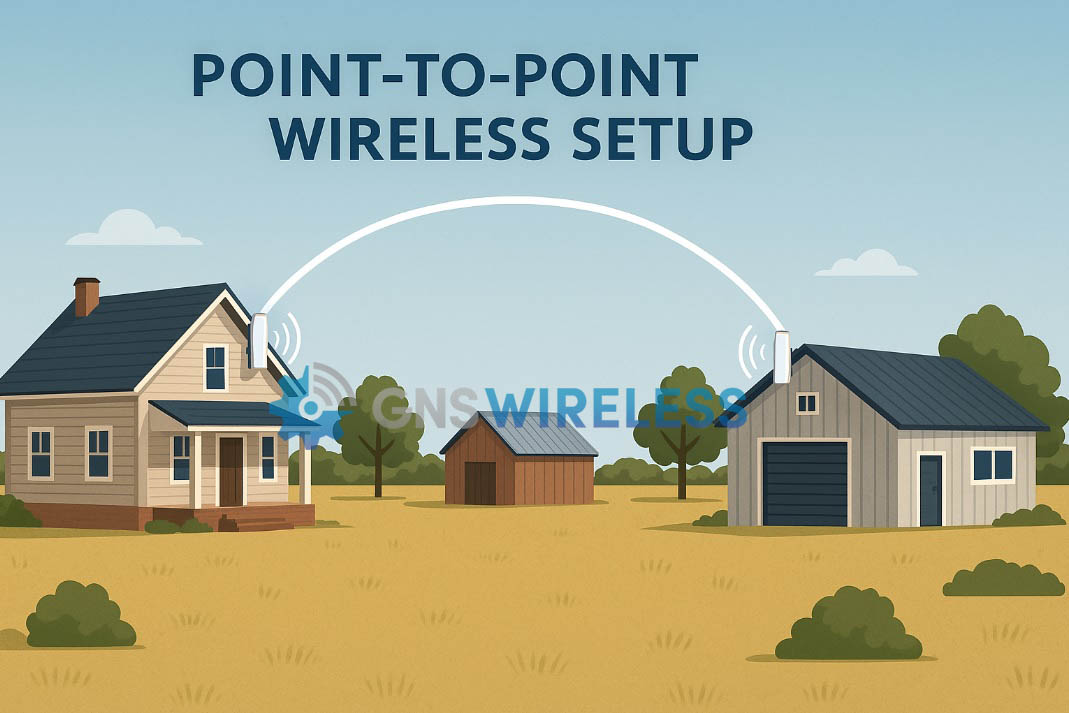
Bring the Internet Where You Need It – Without Laying a Single Cable
Problem:
You’ve got fast internet at the house—maybe not gigabit speeds, but a reliable 100 Mbps up and down. That’s more than enough for HD streaming, security cameras, and remote work. But the workshop, guest house, or equipment barn sitting just over a quarter mile away? It’s a dead zone. Running cable is expensive or downright impossible, especially in rural areas. You’ve got clear line-of-sight, but there’s a slight obstruction—a metal-roof building right in the path. And worst of all? Rain. Every time the clouds roll in, you’re worried the signal might drop.
So what do you do?
Solution:
Introducing the GNS-1153AC Point-to-Point Wireless Bridge – the perfect solution for rural point-to-point connectivity when you need symmetrical upload and download performance without breaking the bank.
Why the GNS-1153AC?
-
Speed You Can Actually Use
Your ISP gives you 100 Mbps up/down. The GNS-1153AC can handle up to 450+ Mbps throughput, so it won’t be the bottleneck—ever. Stream multiple video feeds, upload files to the cloud, and watch 4K content in the remote building with ease. -
Built for Both Upload & Download
Many consumer-grade bridges skew toward download-heavy use. Not the GNS-1153AC. It’s optimized for balanced traffic—great for streaming video and remote cameras that require consistent upstream performance. -
Handles the Elements
Rain, humidity, and rural weather are no match. With an IP-rated outdoor enclosure, the unit is built to withstand the conditions. Plus, the 5 GHz band reduces interference from other devices and offers a solid connection even in open-country environments. -
Overcomes Minor Obstacles
That metal-roof building in your line of sight? No problem. Thanks to directional antennas and beamforming, the GNS-1153AC can punch through or over low-obstruction paths while maintaining a stable link. -
Simple Setup – No Trenching, No Permits
Install one radio on your house and the other on the distant building. Run a simple Ethernet cable to each from your local router or switch. You’ll be online across the property in under an hour.
Real-World Example
A customer in rural Tennessee recently used the GNS-1153AC to connect his home office to a detached garage 1,200 feet away. With only one tree line and a metal barn roof to contend with, the link provided a steady 150+ Mbps—even during stormy weather. Now he monitors three IP cameras and streams live sports out in the garage without buffering.
Is This the Right System for You?
If you:
-
Have clear or mostly clear line-of-sight between the buildings (even over a roof),
-
Want fast upload and download speeds (not just download),
-
Need a stable connection that doesn’t fade with the rain, and
-
Don’t want to pay a fortune for trenching fiber or coax…
Then the GNS-1153AC is exactly what you need.
Take the First Step Toward Better Connectivity
📦 Order the GNS-1153AC Wireless Bridge Today
📍 Click here to learn more and buy now →
Still not sure?
Give us a call at 877-209-5152 or email support@gnswireless.com and we’ll walk you through it.
(For the Skimmers)
-
✅ Reliable 100–450 Mbps throughput
-
✅ Supports symmetrical upload/download
-
✅ Rugged, weather-resistant build
-
✅ Easy to install over 1/4 mile+ range
-
✅ Ideal for rural streaming and camera feeds
No trenching. No lag. Just fast internet where you need it.
-
Best wireless bridge for rural property
-
How to share internet between buildings
-
Weatherproof point-to-point wireless system
-
1/4 mile WiFi bridge for video streaming
-
Upload-friendly wireless link for cameras
-
How to get internet to a garage or outbuilding
-
Stable wireless bridge for rainy climates
-
No trench internet solution for rural homes
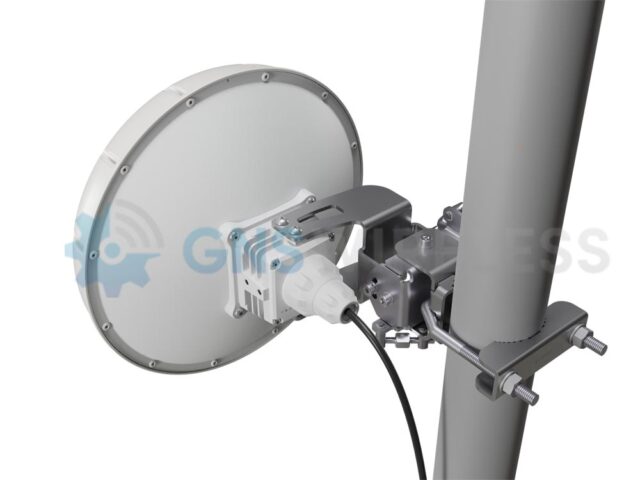
If you’ve installed the GNS-5660 nRAY60 Point-to-Point Wireless Bridge, you’re already on the fast track to delivering up to 2 Gbps of interference-free bandwidth over a distance of up to 1,400 feet. But like any high-performance wireless gear, proper setup and alignment are key to getting the most out of your investment.
In this guide, we’ll walk you through:
-
How to log into the device
-
How to check signal strength
-
How to align the antennas using built-in tools
-
How to change the IP address if needed
-
Where to get support and product details
🔐 Step 1: Log Into the Device
The GNS-5660 kit arrives pre-configured and ready to plug-and-play. However, to monitor or fine-tune the link, you’ll need to access the MikroTik interface.
IP Address Quick Reference:
| Configuration | IP Addresses |
|---|---|
| GNS Pre-Configured | 192.168.1.251 and 192.168.1.252 |
| Factory Default | 192.168.88.2 and 192.168.88.3 |
💡 To connect, set your PC to a static IP like
192.168.1.100(or192.168.88.100) and plug directly into either antenna POE injector via Ethernet, or connect both to a Ethernet switch.
Once connected, open a web browser and type the device’s IP address into the URL bar. GNS configures these to username admin, and password Admin1234.
🛠️ Step 2: How to Change the IP Address
If you’d like to assign the radios new IPs to match your local network:
-
Go to WebFig > IP > Addresses
-
Click the existing IP and update it (e.g.,
192.168.1.251/24) -
Click Apply and then OK
-
Reconnect to the new IP to continue
📊 Step 3: Check Signal Strength
From the main dashboard (QuickSet) or under WebFig > Interfaces > W60G, you’ll see a signal strength bar graph and other key metrics.
What the Signal Bars Mean:
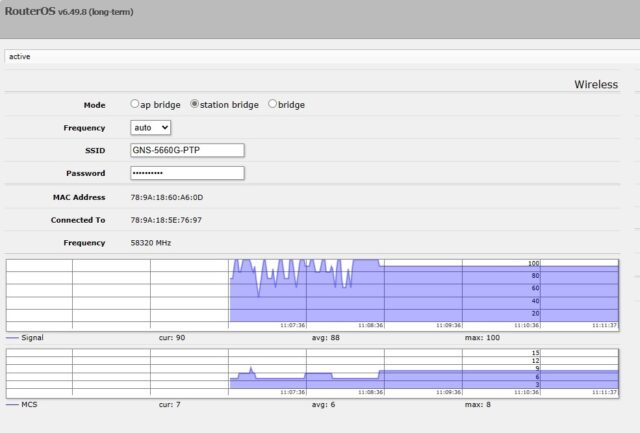
📸 Signal strength display:
The higher the signal, closer to 100, the better/stronger your link is. Maximum MCS is 9, which illustrates you have a 2 Gbps capacity link.
🎯 Step 4: Align the Antennas
Even though the GNS-5660 comes pre-paired, precise alignment ensures a rock-solid connection, especially when using 60 GHz antennas.
Use Built-in LED Indicators:
-
Look at the back of the antenna for arrow-shaped alignment LEDs
-
The arrows indicate which direction to point the antenna, however depending on your distance, these are not as precise as using the web GUI for alignment. Use the external LEDs for general confirmation that the link is established.
Fine-Tune in WebFig:
-
Monitor the signal strength as you gently adjust the direction
-
Make tiny adjustments and wait a few seconds for signal to stabilize
-
Aim for -55 to -69 dBm for best results (-55 being stronger)
🏞️ Pro Tip: Be sure there are no obstructions like trees, walls, or glass between the units. The 60 GHz band requires clear, unobstructed line of sight.
💾 Step 5: Save Your Settings
Once everything looks great:
-
Go to System > Reboot
-
Click Reboot to apply changes permanently
💡 Don’t forget to backup your configuration to simplify future troubleshooting.
📞 Need Help?
If you’re unsure about setup, alignment, or integration into your network, the experts at GNS Wireless are here to help. We offer pre-configured kits, U.S.-based support, and optional weatherproof enclosures for outdoor installs.
👉 Contact Us
📧 support@gnswireless.com
📞 (877) 209-5152
🛒 Shop the GNS-5660 Wireless Bridge Kit
Ready to get connected?
🔗 Click here to view the GNS-5660 product page
This complete kit includes:
-
(2) pre-paired 60 GHz radios
-
Gigabit PoE injectors
-
Pole mounting hardware
-
Pre-configured IPs for plug-and-play use
- 100ft. of outdoor Cat6 Cable
Looking for other wireless bridge options?
Explore more Point-to-Point Wireless Bridge Kits for any application or distance.
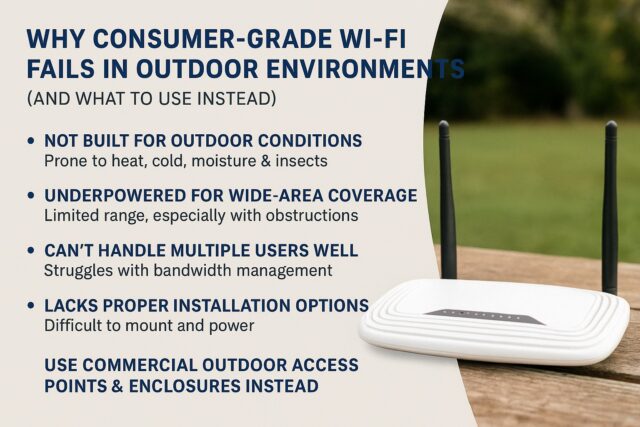
Why Consumer-Grade Wi-Fi Fails in Outdoor Environments (and What to Use Instead)
Let’s be honest: that $79 router from Amazon isn’t cutting it — not in your RV park, marina, or campground. Not at your pool house, and probably not even in your backyard either. You may have installed it with the best intentions, hoping it could stretch its signal from the office to the cabins or docks or your shed. But now, guests and/or family are frustrated, reviews mention “spotty Wi-Fi,” and streaming is a nonstarter. Your kids need that Wi-Fi to be reliable in the backyard. Your guest want to stream that Netflix movie, but…they are too far from the office. Call GNS. We’ll fix it.
If you’re wondering why consumer-grade Wi-Fi fails outdoors, you’re not alone. And more importantly, there’s a better solution.
1. They’re Not Built for Outdoor Conditions
Consumer routers are designed to sit comfortably on a desk or shelf inside a temperature-controlled home. The moment they’re exposed to heat, cold, moisture, or insects, they begin to break down.
>No weatherproofing. No UV protection. No sealed ports. Just fragile plastic and wishful thinking.
🌧️ Rain, dust, or even strong sunlight can knock them out — permanently.
Instead, commercial outdoor access points and enclosures (like the ones GNS Wireless provides) are built to operate in -40° to 140°F, with rugged housings, surge protection, and NEMA-rated designs that last.
2. They’re Underpowered for Wide-Area Coverage
Most residential Wi-Fi gear is built to cover 1,500–2,000 square feet — maybe a backyard patio if you’re lucky. That’s nowhere near enough for:
-
A 20-acre RV park
-
A marina with slips 300 feet from shore
-
A campground full of tree cover and cabins
These environments need gear with high-gain antennas, dedicated backhaul, and proper mounting height to push signal through obstructions and across long distances.
3. They Can’t Handle Multiple Users Well
Weekend surge? Forget it. Consumer routers choke when more than a handful of guests try to stream, game, or Zoom. You’ll see buffering, connection drops, and frustrated support calls.
What you need is equipment that’s designed for multi-user environments, with features like:
-
Bandwidth management (QoS)
-
Roaming support
-
VLAN segmentation
-
External antennas for directional coverage
4. They Lack Proper Installation Options
You can’t mount a typical router on a utility pole or run it 200 feet from your office — not without hacking it apart or running into code issues. That’s why professional outdoor Wi-Fi uses:
-
POE-powered devices (no need for AC power at the install point)
-
Compact, weatherproof boxes to house network equipment
-
Directional antennas to focus coverage
GNS Wireless offers pre-configured setups and power options that make installation clean, compliant, and reliable.
5. They Can’t Grow With You
Let’s say you want to add security cameras, smart meters, or extend Wi-Fi to a new loop of RV sites. With consumer equipment, your only upgrade path is… buying another consumer router. And that just adds interference.
Enterprise-grade systems let you scale intelligently, using:
-
Access points that mesh or bridge
-
Central management software
-
Enclosure kits with room for POE switches and surge protection
What to Use Instead
If you’re managing a campground, marina, outdoor event space, or even a large private property, skip the off-the-shelf gear. You need:
-
Outdoor-rated access points
-
NEMA-rated enclosures
-
Power systems tailored to remote or solar applications
-
Custom site planning to ensure full coverage
At GNS Wireless, we don’t sell consumer junk. We provide real solutions — designed for the environment, built for performance, and backed by 20 years of experience. Once installed…guess who you can call…not Amazon…you call us directly! (877) 209-5152
Final Thought
Your Wi-Fi setup should work with your outdoor space, not against it. Don’t let consumer-grade gear cost you 5-star reviews and customer satisfaction.
💡 Want to find out what setup is right for your space? Contact GNS Wireless today for a free site survey and customized quote.