
Mimosa B5 Installation Case Study: Point-to-Point Wireless for 4K Camera Backhaul
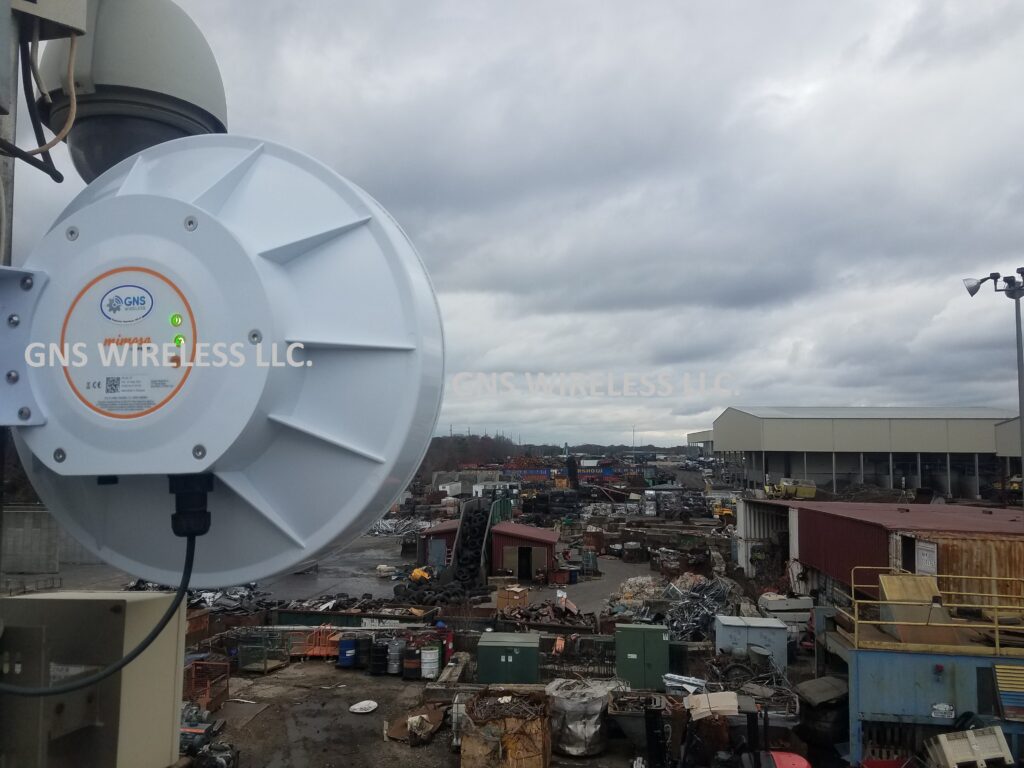
Designing a reliable point-to-point wireless installation for a large industrial site is very different from deploying radios in a clean, rural RF environment. This Mimosa B5 installation was completed at a large construction and recycling yard, where the customer required extremely high reliability and sustained throughput to support dozens of real-time 4K security camera streams.
For this project, GNS Wireless deployed the Mimosa B5 as a short-range point-to-point wireless backhaul solution connecting multiple areas of the yard.
Project Overview: Industrial Wireless Camera Backhaul
-
Application: Wireless backhaul for 4K security cameras
-
Industry: Construction & recycling
-
Technology: 5 GHz point-to-point wireless
-
Line of Sight: Clear LOS on both links
-
RF Environment: Heavy 5 GHz interference
-
Network Role: Core transport for live video monitoring
Link Distances
-
Link #1: ~¼ mile
-
Link #2: ~⅓ mile
These distances fall squarely into what GNS considers the ideal range for short-range point-to-point wireless, especially in noisy industrial environments.
Why This Network Was Demanding
This was not a casual data link.
The customer relied on these links for:
-
Real-time monitoring of dozens of 4K cameras
-
Continuous video streaming with no buffering
-
Reliable recording and playback
-
Low latency for operational awareness
This type of industrial wireless camera backhaul demands:
-
Sustained throughput
-
Stable modulation
-
Minimal packet loss
-
Zero random link drops
Installation Challenges: Signal Levels & RF Saturation

Initial Power-Up Observations
When the Mimosa B5 radios were first powered on and the point-to-point links were established:
-
Signal levels were too strong, measuring in the low –30 dBm range
-
Radios were effectively running hot
-
Excessive signal strength can reduce link efficiency and long-term stability
This is a common issue in short-range point-to-point wireless installations, particularly when using high-gain integrated antennas with clear line of sight.
AUTO Configuration vs Manual Tuning
The Mimosa B5 allows installers to select an AUTO configuration mode, where the radio automatically chooses:
-
Channel
-
Channel width
-
Transmit power
-
Based on an RF scan
While AUTO mode is convenient, it is rarely optimal for high-throughput industrial wireless backhaul, especially when:
-
RF interference is heavy
-
Camera traffic is continuous
-
Latency consistency matters
Manual Configuration Strategy
For this Mimosa B5 point-to-point deployment, GNS Wireless manually adjusted:
-
Transmit power (to bring signal levels out of the –30s)
-
Channel selection
-
Channel width
This approach allowed us to:
-
Reduce RF saturation
-
Improve modulation stability
-
Maintain consistent throughput for video traffic
Channel Width & Duplex Mode Optimization
The Mimosa B5 offers flexibility beyond a standard setup:
-
Standard 80 MHz channel
-
Full Duplex 80 MHz mode, which provides:
-
Higher usable capacity
-
Lower latency
-
Better performance for video-heavy applications
-
Final Configuration (The Sweet Spot)
After testing multiple options, both links performed best with:
-
Operating frequency: Lower 5 GHz range (~5300 MHz)
-
Channel width: Full Duplex 80 MHz
-
Transmit power: Manually reduced for optimal RSSI
This configuration delivered the most stable short-range point-to-point wireless performance in a heavily congested RF environment.
Real-World Mimosa B5 Throughput Results
With the links properly tuned:
-
Observed sustained throughput: ~500 Mbps
-
Stable performance under continuous load
-
Reliable transport for multiple simultaneous 4K video streams
Important Throughput Reality
Even at short distances:
-
Full gigabit capacity was not achievable
-
RF noise and interference capped usable throughput
This is an important takeaway for anyone planning a Mimosa B5 installation for cameras.
Distance Guidance: What GNS Wireless Recommends
Based on this deployment and extensive field experience:
✅ Ideal Use Case
-
¼ mile
-
Clear line of sight
-
Wireless backhaul for 4K security cameras
⚠️ Acceptable With Care
-
Up to ½ mile, with:
-
Excellent LOS
-
Manual tuning
-
Realistic throughput expectations
-
❌ Not Recommended
-
Beyond ½ mile
-
Non-line-of-sight paths
-
Applications requiring guaranteed gigabit throughput
Unless you are operating in an extremely clean RF environment, the Mimosa B5 should be viewed as a short-range point-to-point wireless solution, not a long-haul backhaul radio.
Why GNS Wireless Was Chosen
This project succeeded because the network was engineered, not guessed.
GNS Wireless Services Include:
-
Pre-configured Mimosa B5 radios
-
RF planning and channel selection
-
Manual power and channel optimization
-
Professional point-to-point wireless installation
-
U.S.-based technical support
Product & Services
-
🔗 Mimosa B5 Point-to-Point Wireless Antenna
👉 Available on gnswireless.com -
⚙️ Pre-Configuration Available
Optimized before shipment for your distance, RF environment, and application. -
📡 Installation Services Available
Ideal for construction sites, recycling yards, and industrial camera networks.
Final Takeaway
This Mimosa B5 installation case study demonstrates an important truth:
Short-range point-to-point wireless can deliver excellent real-world performance — but only when it’s properly tuned.
For industrial wireless camera backhaul, design discipline matters more than spec sheets.
👉 Contact GNS Wireless to design, pre-configure, and install a point-to-point wireless solution that performs in the real world — not just on paper.
How to Factory Reset the Cambium V1000 cnWave
What Is a Cambium V1000 Reset?
The Cambium V1000 is a 60 GHz cnWave wireless device often used for high-throughput backhaul links. Resetting can mean:
-
Soft reset: restart unit without changing configuration
-
Factory reset: erase custom settings and restore defaults
-
Recovery mode: for units that won’t boot normally or after failed firmware update
This article focuses on factory and recovery procedures.
🔧 Standard Factory Reset (Recovery Mode)
Please Note: The Cambium V1000 does not have an internal reset button. Use the following procedure to correctly reset the cnWave if you have forgotton the IP address or have misplaced the UN/PW for GUI access.
1. Prepare Your Laptop
-
Connect laptop directly to the V1000 via Ethernet + PoE injector.
-
Set your laptop to a static IP on the 169.254.x.x range (e.g.,
169.254.1.100/255.255.0.0).
2. Enter Recovery Mode
-
Ensure the unit is powered OFF.
-
Turn it ON and wait ~120 seconds for the initial boot.
-
Then power cycle the unit again quickly (OFF then back ON within ~5 seconds).
3. Access the Recovery Interface
-
In a browser, go to:
👉 http://169.254.1.1
(Note: usehttp://, nothttps://in recovery mode).
4. Factory Reset
-
On the recovery page, look for “Factory Reset” and confirm.
-
The device will erase custom settings and restore defaults.
✅ Tip: If you see a solid green LED and the browser can’t reach the page, ping the link-local IPv6 address that corresponds to the radio’s MAC — some users access this to trigger management access
Troubleshooting & Common Issues
❗ Recovery Not Accessible?
-
Make sure your laptop’s IP is in the 169.254.0.0/16 range (no DHCP).
-
Ensure your browser isn’t adding https:// automatically.
🔄 Units Not Responding After Reset?
-
Try power cycling manually (remove and re-apply power).
-
In stubborn cases, confirm recovery LEDs and retry.
📌 After Reset — What to Expect
Once the V1000 is reset:
-
Its IP/GUI credentials revert to factory defaults. (169.254.1.1 admin/admin)
-
You’ll need to reconfigure network settings or reconnect it to your cnMaestro controller or E2E solution.
-
For security, set new admin password before putting into production.
⚠️ Notes & Best Practices
-
Always back up any configuration before resetting.
-
If the unit was “bricked” after a firmware upgrade, recovery mode is your best bet.
-
Firmware might need re-installation after factory reset in complex setups.
Outdoor Network Enclosures: How to Choose the Best Weatherproof Option for Your Equipment
Outdoor networking equipment faces constant exposure to weather, temperature swings, dust, and physical wear. Without proper protection, Wi-Fi access points, PoE switches, wireless bridges, and power equipment are vulnerable to failure. That’s why outdoor network enclosures are a critical part of any reliable outdoor deployment.
Unlike generic electrical boxes, a weatherproof network enclosure is specifically designed to protect sensitive networking gear in real-world outdoor environments — from campgrounds and marinas to farms, industrial yards, and remote properties. This guide explains how to choose the right enclosure for your application, what features matter most, and how to ensure long-term performance.
Why Outdoor Network Enclosures Are Essential
Network equipment is built for performance, not exposure. When installed outdoors without proper protection, even commercial-grade hardware can suffer from moisture intrusion, overheating, corrosion, or pest damage.
A properly selected outdoor enclosure for WiFi equipment protects against:
-
Rain, snow, and condensation
-
Wind-driven dust and debris
-
UV exposure and direct sunlight
-
Insects, rodents, and airborne contaminants
-
Temperature extremes that shorten equipment lifespan
Using a dedicated outdoor network cabinet dramatically reduces downtime, service calls, and premature equipment replacement — especially in environments where uptime matters.
Understanding NEMA and IP Ratings for Outdoor Networking
Environmental ratings define how well an enclosure protects your equipment. For outdoor networking applications, NEMA ratings are the most commonly referenced standard in North America.
Common options include:
-
NEMA 3R – Suitable for basic outdoor exposure and rain protection
-
NEMA 4 / 4X – Designed for harsher environments with wind-driven rain, dust, and corrosion resistance
Selecting the right NEMA enclosure for networking equipment ensures your hardware remains protected year-round, even in challenging climates or coastal environments.
Key Features to Look for in Outdoor Network Enclosures
Weatherproof Materials and Sealing
A high-quality weatherproof network enclosure should use corrosion-resistant materials, UV-stabilized finishes, and tight gasketing to prevent moisture and dust intrusion. Poor seals are one of the most common causes of outdoor equipment failure.
Proper Sizing for Network Equipment
Always choose an enclosure based on more than just today’s hardware. A properly sized outdoor enclosure for WiFi equipment should allow room for:
-
PoE injectors or power supplies
-
Cable management and grounding
-
Future network expansion
Oversized enclosures improve airflow and make maintenance easier, especially for multi-device installations.
Ventilation and Thermal Management
Active networking hardware generates heat. For many deployments, an outdoor PoE switch enclosure benefits from passive vents or active cooling. Thermal management helps maintain safe operating temperatures and prevents heat-related performance issues.
Mounting and Security Options
Outdoor network enclosures should support wall mounting, pole mounting, or structure mounting depending on the installation site. Lockable doors and tamper-resistant hardware add an extra layer of protection in public or remote locations.
Choosing the Best Enclosure for Your Outdoor Network
Enclosures for Outdoor Wi-Fi Access Points
Smaller outdoor enclosures for wireless access points are ideal for protecting individual radios or compact devices. These are commonly used for:
-
Outdoor Wi-Fi coverage areas
-
Directional wireless links
-
Point-to-point and point-to-multipoint radios
Compact enclosures provide protection without unnecessary bulk.
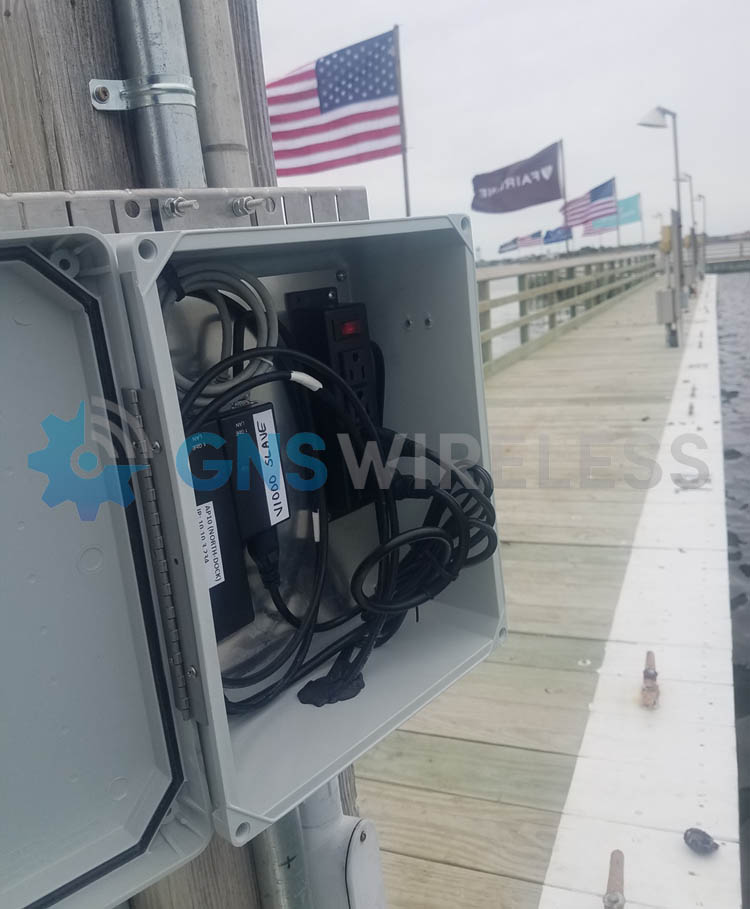
Enclosures for PoE Switches and Power Equipment
Mid-sized outdoor enclosures with power are designed to house multiple devices, including switches, injectors, and power supplies. These are often used in distributed network layouts where power and switching need to be located outdoors near access points. Power outlets are already located inside the box, so wiring is quick and easy. It also keeps your setup nice and tidy.
Large Outdoor Network Cabinets and Telecom Enclosures
For larger deployments, a full outdoor network cabinet may be required. These enclosures support:
-
Multiple switches and power systems
-
Fiber termination and patch panels
-
Batteries and surge protection devices
They are commonly used in industrial facilities, large campgrounds, marinas, and municipal networks.
Installation Best Practices for Outdoor Network Enclosures
To get the most from your enclosure:
-
Use proper cable glands to maintain weatherproof seals
-
Ground all equipment according to electrical codes
-
Avoid direct sun exposure when possible to reduce heat load
-
Plan cable entry points before drilling or mounting
Even the best weatherproof enclosure with power can fail if installation details are overlooked.
Final Thoughts: Keeping Outdoor Networks Reliable
A well-designed outdoor network starts with proper protection. Choosing the right outdoor network enclosure ensures your Wi-Fi, switching, and wireless equipment performs reliably in harsh environments while minimizing maintenance and downtime.
By focusing on correct ratings, proper sizing, ventilation, and secure mounting, you can deploy outdoor networking equipment with confidence — knowing it’s protected for the long haul.
If you’re planning an outdoor installation, selecting the right enclosure isn’t optional — it’s foundational.
Need help choosing the right outdoor network enclosure?
Explore our full line of weatherproof outdoor enclosures or contact our team for assistance selecting the best solution for your application. (877) 209 – 5152
Outdoor Network Enclosures – Frequently Asked Questions
What size outdoor network enclosure do I need?
The right enclosure size depends on the type and quantity of networking equipment being installed. For single devices like a Wi-Fi access point or wireless bridge, smaller enclosures may be sufficient. Installations that include PoE switches, injectors, power supplies, or future expansion typically require larger enclosures to allow for airflow and cable management.
Common sizes include 14x10x4, 14x12x7, 18x16x8, and 20x16x11, each suited to different outdoor networking applications.
What equipment fits inside a 14x10x4 outdoor enclosure?
A 14x10x4 weatherproof enclosure is ideal for compact installations such as:
-
A single outdoor Wi-Fi access point
-
Small wireless radios or bridges
-
PoE injectors or low-profile power supplies
This size works well when space is limited and heat output is minimal.
When should I use a 14x12x7 outdoor network enclosure?
A 14x12x7 outdoor network enclosure offers additional depth and airflow, making it suitable for:
-
Wi-Fi access points with PoE injectors
-
Small unmanaged PoE switches
-
Outdoor wireless bridge equipment
It’s a popular choice for pole-mounted or wall-mounted outdoor Wi-Fi installations.
What is a good use case for an 18x16x8 outdoor enclosure?
An 18x16x8 outdoor enclosure is commonly used when housing multiple network components, such as:
-
PoE switches and power supplies
-
Wireless controllers or gateways
-
Network surge protection and grounding hardware
This size provides room for cable routing, ventilation, and future upgrades. If your cable modem is coming into the park on a pole, and you want the modem, router and maybe a POE switch to be housed inside, this sized enclosure would be perfect. It will allow air flow, ease of cable management, and when you open the lid, components wont fall out.
When is a 20x16x11 outdoor network cabinet recommended?
A 20x16x11 outdoor network enclosure is best for larger or more complex outdoor network deployments. Typical use cases include:
-
Multi-port PoE switches
-
Fiber termination panels
-
Batteries, controllers, and power distribution
These larger enclosures are often used in campgrounds, marinas, industrial sites, and distributed outdoor networks.
Do outdoor network enclosures need ventilation or cooling?
Yes. Many outdoor network installations benefit from ventilation or active cooling, especially when housing PoE switches or multiple devices. Larger enclosures, such as 18x16x8 or 20x16x11, provide more internal air volume and are better suited for fans or vent kits.
What NEMA rating is best for outdoor network enclosures?
Most outdoor networking applications require NEMA 3R, NEMA 4, or NEMA 4X enclosures.
-
NEMA 3R works for basic outdoor exposure
-
NEMA 4 / 4X provides enhanced protection against wind-driven rain, dust, and corrosion
Choosing the correct rating helps protect network equipment and ensures long-term reliability.
Can outdoor enclosures include power inside?
Yes. Many outdoor network enclosures are available with integrated 120V or 240V power options, allowing PoE switches, injectors, and power supplies to be safely installed inside the enclosure without exposed wiring.
Is it better to oversize an outdoor network enclosure?
In most cases, yes. Selecting a slightly larger enclosure improves airflow, simplifies installation, and allows room for future expansion. Oversizing is especially recommended when installing PoE switches or multiple networking devices outdoors.
Where are outdoor network enclosures commonly used?
Outdoor network enclosures are widely used in:
-
Campgrounds and RV parks
-
Marinas and waterfront facilities
-
Farms and agricultural properties
-
Industrial yards and warehouses
-
Outdoor security and surveillance systems
They provide reliable protection for network equipment in environments where indoor installation is not possible.
The SX3-1021A-QB-US QuickBridge is a powerful, license-free 5 GHz point-to-point wireless bridge.

This commercial grade link is designed for organizations that need fast deployment, high reliability, and zero recurring fees.
At GNS Wireless, we supply, support, and deploy the SX3 QuickBridge for customers who want fiber-like performance—without the cost and disruption of trenching.
Why Choose the SX3-1021A-QB-US?
Unlike consumer or cloud-locked wireless bridges, the SX3 QuickBridge is built for industrial and commercial environments where uptime matters.
Key Advantages
-
Factory-paired radios (plug-and-play deployment)
-
Secure, encrypted wireless link
-
License-free 5 GHz operation
-
Designed for outdoor, all-weather installations
-
No subscriptions, no forced cloud management
Once installed, the link functions as a transparent Ethernet extension—simple, fast, and dependable.
SX3 QuickBridge Technical Highlights
-
Frequency Band: 5 GHz (license-free)
-
Configuration: Pre-paired QuickBridge kit
-
Security: Encrypted wireless link
-
Installation: Outdoor-rated, PoE powered
-
Applications: Cameras, LAN extension, VoIP, internet backhaul
This makes it ideal for both permanent infrastructure and rapid deployments where time matters.
Common Applications
-
Building-to-building network extension
-
Warehouse and yard connectivity
-
Farm, industrial, and utility sites
-
Schools, campuses, and commercial facilities
-
Temporary construction or event networks
Why Buy from GNS Wireless?
When you purchase the SX3-1021A-QB-US from GNS Wireless, you get more than hardware:
-
✔ Pre-sale design assistance
-
✔ Real-world installation guidance
-
✔ Optional turnkey deployment services
-
✔ U.S.-based technical support
-
✔ No upsells, no licensing traps
We make sure the link works before it ships, not after you’re on a ladder.
Order the SX3-1021A-QB-US Today
👉 SX3-1021A-QB-US QuickBridge – Available Now
Need help confirming distance, mounting height, or line-of-sight?
Contact GNS Wireless for a free consultation before you buy.
FAQ Section
SX3-1021A-QB-US QuickBridge – Frequently Asked Questions
What is included in the SX3-1021A-QB-US QuickBridge kit?
The kit includes two factory-paired outdoor radios designed to form a secure, point-to-point wireless link immediately after installation.
Is the SX3 QuickBridge pre-configured?
Yes. The radios ship pre-paired from the factory, eliminating complex setup and reducing installation time.
Does the SX3 QuickBridge require licensing or monthly fees?
No. The SX3-1021A-QB-US operates in license-free spectrum and does not require subscriptions, cloud access, or recurring fees.
What applications can the SX3 QuickBridge support?
It supports internet backhaul, IP cameras, VoIP, building-to-building LAN extension, and other high-throughput network traffic.
Is the SX3 QuickBridge suitable for outdoor use?
Yes. The system is designed for permanent outdoor installations and harsh environmental conditions.
Can the SX3 QuickBridge replace fiber?
In many scenarios, yes. It provides fiber-like performance without trenching, making it ideal for industrial and commercial sites.
Why buy the SX3 QuickBridge from GNS Wireless?
GNS Wireless provides design support, real-world deployment expertise, and U.S.-based technical assistance—ensuring the system works before and after installation.
Looking for point-to-point wireless installation at your site? Contact GNS Wi-Fi and let us plan your next wireless network the right way.